For students of E&EB 223L
Contents
Getting started
1. How to find your tree using a mobile device
2. How to add a tree to this site
3. How to edit your tree
Miscellaneous
How to rotate your images
How to get the latitude and longitude of your tree
How to create and add the Range of distribution map
How to embed content using an iFrame
How to Upload the Final Video
Frequently asked questions
Additional help, questions, or requests for the site
How to find your tree using a mobile device
- If you are on a mobile device, you can go to the mobile version of the map by clicking here or following the link on the TAKE THE WALK page.
- You should have been assigned a tree # from your TA. Find your tree’s location on the Story Map. Find your current location by clicking on the crosshairs button
 . Your location will appear as a blue dot on the map.
 - Move toward the location of the tree and click on the crosshairs to update your location, until you find the exact location of the tree.
How to add a tree to this site
- Click on the
 button at the top right of the front page.
 - Enter your netid credentials to log in.
- Click on the
 button at the top right of the front page.
 - If you are at the location of the tree currently, and are prompted to share your location with the browser, select agree or allow.
- If you are not on a mobile device at the location of the tree, and are prompted to share your location, do not agree. Select “Never Share Location”, “Deny”, or similar depending on your device/browser to stop getting these messages.
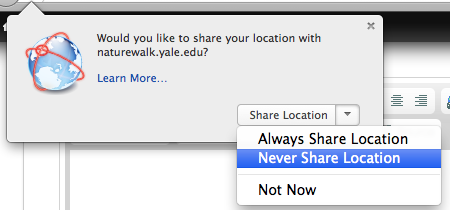


NOTE: If you agree to share your location and you aren’t actually at the tree, the correct latitude/longitude will be overwritten with your current location. If this is the case, you will need to get the correct location from here. - You must have the tree’s common name and the tree’s ID number in order to add it- this will be the title of the page.
- Adding the Main image
a. You can take or upload images directly from your mobile device, or take pictures on location and upload them later from your computer. Note: if you upload from an iOS device, the image may be oriented incorrectly. If this is the case, learn how to fix it here.
b. If you are not on a mobile device and would like to upload an image, after browsing for and selecting an image you wish to upload, be sure to press the button. When the image is uploaded, you will see a thumbnail of the image.
 - Fill out the rest of the fields as instructed. For information on the Range of Distribution map, click here.
- Leave the settings at the bottom as is.
- Click the
 button at the bottom.
Important notes
If you are typing a longer text field, we recommend you type the text in a text editor, such as Microsoft Word, and then copy it to the text field on this site. This site does not autosave as you write, so if you navigate away from the page you are in danger of losing what you wrote since your last save.
How to edit your tree
- You can find your tree on the map (only if you have a picture and description), by searching the site, or by clicking on the TREES link
 on the menu bar.
 - If you are on the full tree page, click the Edit button
 at the top of the page. If you are on the Trees page, click edit to the right of your tree.
 - Make your changes, but make sure that you do not allow the browser to capture your location unless you are on the exact location of the tree, otherwise it will overwrite the correct coordinates. If this happens, follow the instructions here.
- Be sure to click the button at the bottom when you’re done.
How to rotate your images
If you upload a vertical image taken on an iOS device (iPad or iPhone), the site should automatically rotate the image correctly, but sometimes this is broken. These instructions help you fix the image so that it displays correctly.
- Hover over the image you’d like to rotate (this must be done on a laptop/desktop, not a mobile device).
- Click on the small icon of a ladybug on a green background at the top left of the image
 to open Pixlr Express.
 - When there are multiple images together the Pixlr icon will show for the first one only. To edit subsequent ones, click the image so that it pops up and you should see the icon there.
- The window will appear. You may need to allow the page to run flash or allow pop-ups. If nothing happens you may have security settings that either block pop-ups or Flash. Try another browser.
- Click the Adjustment icon at the bottom left, then the Rotate icon.
- Click one of the Rotate buttons or select a custom rotation. You can also select a number of other photo editing options
- Ciick the Save button at the top left.
- You should get a message that looks like the following. Click OK.
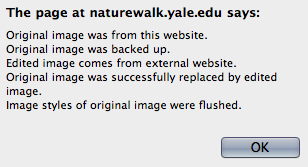
- You may need to refresh the page before the image is updated.
How to get the latitude and longitude of your tree
- If you are on a mobile device and are at the exact location of the tree, then you can allow the browser to capture your location and the latitude and longitude will automatically be entered for you.
- If you were unable to get the coordinates on location, or you accidently overwrote them by allowing the site to use your incorrect location, use the chart below.
1 41.32182249 -72.92563526 2 41.32187928 -72.92554264 3 41.32198032 -72.92528967 4 41.32146027 -72.9240743 5 41.32131618 -72.92400531 6 41.32138608 -72.92407396 7 41.32123848 -72.92411688 8 41.32114582 -72.92358312 9 41.32098681 -72.92349427 10 41.32129984 -72.92387363 11 41.32175673 -72.92352797 12 41.32181143 -72.92377825 13 41.32074985 -72.92299308 13 41.3108061 -72.92902521 14 41.32094436 -72.92301541 15 41.32040821 -72.9218339 16 41.32065617 -72.92213042 17 41.3193303 -72.91921648 18 41.3189257 -72.91955369 19 41.31657244 -72.92052104 20 41.31655928 -72.92062473 21 41.31645769 -72.92058391 22 41.31624924 -72.9206585 23 41.31620326 -72.92074434 24 41.31607141 -72.92087384 25 41.31605205 -72.92084173 26 41.3158337 -72.92083645 27 41.31580478 -72.9209072 28 41.31577976 -72.92161002 29 41.31605465 -72.92321708 30 41.31554563 -72.92319738 31 41.31528721 -72.92376626 32 41.31429385 -72.92373835 33 41.31424911 -72.92389836 34 41.31420495 -72.924325 35 41.31106482 -72.92920201 35 41.3137271 -72.92381974 36 41.31422329 -72.92380348 37 41.31422564 -72.92361606 38 41.31487769 -72.92280285 39 41.31483829 -72.92253245 40 41.31483127 -72.92187455 41 41.31471783 -72.92181714 42 41.31529814 -72.92232399 42 41.31532211 -72.92239976 43 41.31798236 -72.92415367 44 41.31789208 -72.92407832 45 41.31653903 -72.92366048 47 41.31243492 -72.92690436 48 41.31243966 -72.92678182 49 41.3126552 -72.92658594 50 41.3128062 -72.92651075 51 41.31291843 -72.92702406 52 41.31351489 -72.92705582 53 41.31397502 -72.92682566 54 41.31391814 -72.92674393 55 41.31425065 -72.92730074 56 41.31374673 -72.927518 57 41.31363471 -72.9270451 58 41.31365365 -72.92697846 59 41.31899463 -72.92513754 60 41.31893002 -72.92551431 61 41.31904739 -72.92568857 62 41.31935543 -72.92589895 63 41.32002977 -72.92594237 64 41.3210449 -72.92580855 65 41.32165107 -72.92579138 66 41.32171416 -72.92579234 67 41.32181868 -72.92573257 68 41.32204189 -72.92582687 69 41.32220952 -72.92514601 70 41.32213463 -72.92497577 71 41.32203803 -72.925116 72 41.32194134 -72.92488567 73 41.32197886 -72.92487569 74 41.32161374 -72.92486169 75 41.32140769 -72.92504811 76 41.32122941 -72.92442684 77 41.32105693 -72.92372301
How to create and add the Range of distribution map
Download the image from Wikipedia (make sure that the map is from Wikimedia Commons and is not copyrighted)
- Click on the map image in the Wikipedia entry to open the full-sized version of the map
OR Create your own map
- Click here to select states and here to select countries
- Check the boxes next to the states/countries that have the tree species
- Click the
 button at the bottom
The rest of the steps are the same:
- Right-click (or control-click on a mac) on the map image and select

- Choose where you want to save the image (it doesn’t really matter just as long as you remember where you saved it, you can delete it after it’s uploaded to the site) and press the
 button
 - On your tree edit page, under Research/Range of distribution, click the button
- When you are done editing the tree, click the button on the bottom
How to embed content using an iFrame
This works best if you have an embed code from a site. You can theoretically embed any site, however you will encounter mixed results. This is a great way to include visually rich, interactive content, such as this timeline app.
- Click here for instructions on generating the embed code from common sources such as social media.
- Once you have the code, go into the content creation or editing page and find the text field you’d like to embed into. This can be the iFrame field or even the body.
- Paste the code into the location you’d like it to appear.
- Click the button at the bottom of the page.
If you would like to try to embed a site, you can use the following template to create a square iFrame with no border:
<iframe frameborder="0" height="650px" src="http://WEBSITEURL" width="100%"></iframe>
You can change the height/width/border to customize the iFrame.
How to Upload the Final Video
- Upload the video to the Media Library in the project’s Canvas site.
- Once it’s finished uploading, hover over it and select the Share button.
- Click on the Embed link at the top.
- Click the Copy Embed Code button.
- On this website, edit the tree page and go to the Media & Arts section. Then go to the Final Presentation field.
- Click the Source button on the editing toolbar and paste the embed code here.
- Be sure to save the page at the end.
Frequently asked questions
Why isn’t my image showing up?
You may not have finished uploading the image. After selecting the image you wish to upload, be sure to press the ![]() button. When the image is uploaded, you will see a thumbnail of the image.
button. When the image is uploaded, you will see a thumbnail of the image.
Why does the map or page look strange or not load?
Try another browser. Chrome has been having a lot of problems displaying content correctly.
Why isn’t my tree on the map?
Your tree may not be published, or you don’t have anything text in the Description field for the tree.
Why is my tree pin in the wrong location?
Make sure you copy the latitude and longitude in the correct order from ArcGIS- it’s listed as long/lat on the ArcGIS website and lat/long in this site. Also, don’t allow the page to share or capture your current location unless you are actually at the tree. If you did so by accident, you can copy the correct location from here.
Why is there no image on the map or in search results?
You need to upload an image in the Main Images field, preferably the same image as you used in the ArcGIS entry. See the FAQ above if you are having trouble uploading the image.
Additional help, questions, or requests for the site
Need help? Check here for help with measuring or identifying the tree, or email marta.wells@yale.edu for more info.